Friday 30 January 2015

Art Bead Scene January Inspiration Challenge

The inspiration for this month is this playful poster “Imagine Tomorrow's World” created by Friedensreich Hundertwasser (born as Friedrich Stowasser) to mark the 50th anniversary of the IUCN, The World Conservation Union in November 1998. The proceeds of the sales went towards IUCN environmental projects. The poster was sponsored by the magazine Newsweek International, which used it for the cover of its special issue "Imagine Tomorrow's World" of November 1998, which made up part of the Newsweek issue of November 9, 1998.


“Imagine Tomorrow’s World”
Original Poster, orange version
by Friedensreich Hundertwasser


The first time I saw this poster my thoughts immediately went to the vibrant orange Lampwork discs that had been sitting on my bench since last summer. Fabulous orange discs spun thickly and coated with clear glass, they were made by Dragonjools of Toronto ON. The thickness made these discs different from any others I have seen.

I had purchased them with the intention of making a summer bracelet but couldn’t get the design right. Then I tried a necklace, and wasn’t happy with it either. I put the beads aside for a little while, which quickly stretched into months. This inspiration renewed my determination to use them in something fabulous.

I decided to approach with a fresh perspective. Where before I was using metal to hold and form the pieces, this time I took a softer approach and started pulling out the different types of cording material I had acquired. The black waxed cotton cording was the winner. Next it was time to add other colours.

I went with the lovely green Aventurine that had been in my hoard stash for a few years. It felt like a contrast was needed and that’s where the glass washers with their deep blues and purples came in. First pass at stringing the necklace was done but it just didn’t do it for me. I had recently purchased some Lampwork Glass Discs of varying colours from SueBeads of Pittsburgh PA. Going back to the poster, I picked discs in colours that worked, both with the poster and for me, and placed them randomly between the orange discs. I strung the necklace so that there would be lots of cord ends in front to dangle more glass washers from, and finished it off with antiqued copper clasp and extender chain.


Carnivale Necklace


There were a couple of the orange discs and aventurine rondelles left, just perfect for making a pair of earrings.


Carnivale Earrings


Now come and check out what everyone else has created.

Wednesday 28 January 2015

2015 Plans

Back in November of last year, I wrote about gettingback on track, making regular blog posts 3 times a week. I have kept this up for the last 3 months and it has been fun.

It has also been challenging since it is only me who is doing the blog postings, along with everything else. I love the blog but it is taking up too much time. Starting next week, I am modifying the blog schedule, posting twice a week instead of 3. Postings will now be on Monday and Thursday though there will still be occasional posts other days for blog challenges and other events.

2015 plans include a greater social presence. I’ve already started a business Pinterest account, launched just over a week ago. Show applications are being prepared, profile updates in progress, many product photos and write ups waiting to be posted online.

Coming soon will be a new Etsy store. Like many jewellery artisans I have acquired a large supply of beads, findings, tools, unique items and so on. A humungous quantity actually. The new store will be geared to making these available to others. I’ve also been upcycling frames, boxes and other things, repurposing them for jewellery storage. Finally, I need to clear out jewellery that did not move at various shows but have yet to be posted in my Artfire shop. Both will be added to sections in the new shop, as will jewellery pieces with little or no action on Artfire.

Another opportunity being explored is Facebook. I have not taken the plunge there but have been looking into setting up a business site on it. That will be a little down the road. I don’t want to take on too much too quickly or else I’ll end up back where I was, too many commitments, not enough time to do them.

Beyond social presence, I’ve started experimenting with polymer clay (see my last couple of posts for evidence of that), intend to expand my limited metal clay skills as well as wire work and metal forming. It would have been more logical to start with polymer clay then move to metal clay but I can’t claim to always have been logical.

And finally, I definitely need to continue expanding my jewellery design skills, including capturing them on paper before trying to create them in more pricey wires, gemstones and pearls.


Wish me luck

Monday 26 January 2015

Failed Crimp Opportunity

Last week I posted about the first polymer clay beads that I made, and the bracelet I used them in. I wore the bracelet the same day. It was a little big so I was already debating redoing it when I caught the bracelet on something and it ended up all over the floor, something like this... 


All because of low quality crimp beads. The one side held fast but the second side did not hold at all. And not just one, but two crimps failed.

An opportunity to start over since I wasn’t totally happy with the extra beads used in the original design anyway. The polymer clay beads were put back in a semblance of order, pony beads chosen to use as separators and a new clasp picked out. The original just didn’t work right with the wide beads.


The polymer beads were separated into sections and restrung with 2 pony beads added between each section. I slipped on the crimps and clasp and tested for size.


Once the fit was adjusted, the crimps were closed and covered up. Two crimps on each side again to be sure.


Friday 23 January 2015

My First Polymer Clay Project

In my post of January 2nd I blogged about the 2015Polymer Clay Challenge, hosted by Katie Oskin with postings added on Facebook as each member completes something. It’s definitely a lively group with lots of discussions and comments.

Here is my first project, as promised in that January 2nd post, undulating discs, or wavy discs as I think of them. 


I started with this selection of pretty colours, shades of blue, copper and a translucent white.


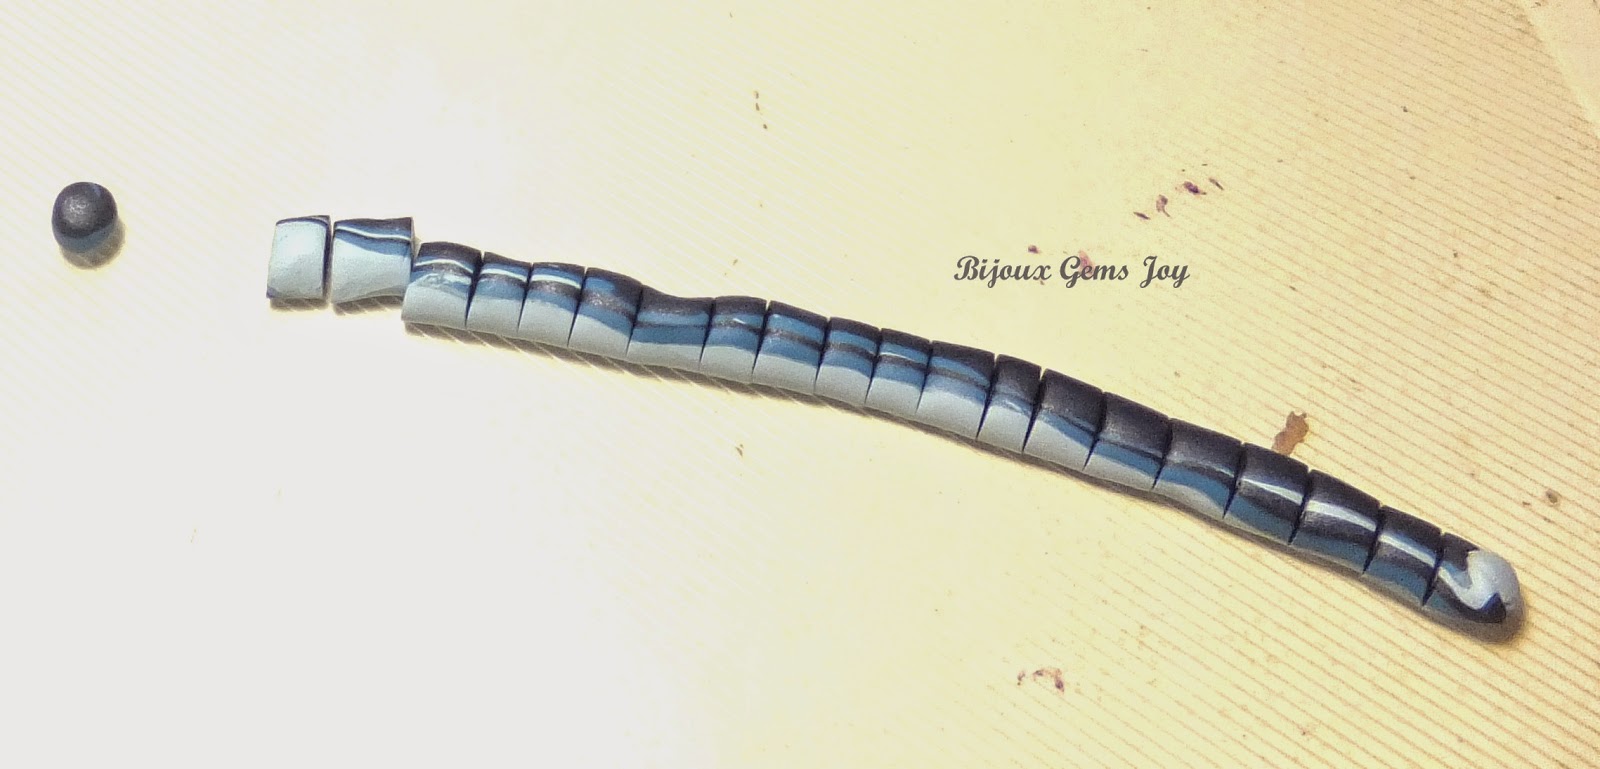
I cut thin slices from each of the blues to start, then stacked them, cut the stack in half, then put the two halves together.


The stack was pinched together at the ends and sides and rolled until it made a snake. Then I sliced it up into random sizes so the discs end up different sizes.

(Ignore the brown flecks you see. That’s the paint missing from my bench and is underneath the non-stick plastic sheet.)


Each slices was rolled into a little ball, following the instructions of the tutorial I was using. Once that was done I flattened each one into a disc and gave it a twist to get the wavy shape.


When that batch was flattened and twisted I made a second batch. This time I added the copper and white clay. Partway through I decided the slices did not need to be rolled into a ball before being flattened, and went straight from a slice to a disc. Why add work if it’s not needed right?


Next the holes were added and into the oven they went. I thought I followed the instructions for the length of time for the thickness. You know that smell that happens when something doesn’t seem right? Well I should have followed that instinct. When I took the tray out of the oven I had…


burnt discs. The white and lightest blue came out beige like and the bright colours were dulled down. Disappointing! I went with the flow though and made a bracelet anyway.


There weren’t enough discs to use them exclusively. I wasn’t up to making more discs so I picked out some acrylic beads, leftover from early days in jewellery making, that worked with the final colours of the polymer discs.

This bracelet was a good learning experience. I think it came out pretty well all things considered. It stays with me.


Wednesday 21 January 2015

A Tour of Favourite Blogs

There are many blogs that I check out on a regular basis. Some are listed on either side of this page, but many are not included. I thought it would be fun to do a little tour.

Today the featured blogs are Jewellery Blog Groups

I think my favourite blogs are those that have a group of like minded individuals posting their contributions. You never know what the subject will be and there tends to be something posted every weekday. Lots to read on these blogs.

Click on each image to go to their blogs


This blog focuses on earrings, with a goal of giving readers inspiration. A monthly inspiration challenge is sponsored by the group. Anyone can participate and just needs to make a pair of earrings that fit into the theme of that month’s inspiration


This blog is run by a group of self-confessed crazy bead ladies. Their blog is all about “beady tips, video clips, stories, notices about classes and sales, and sometimes totally irrelevant stuff that we think is interesting and you might too!” Although this is a company blog I find enough variety to check it out frequently


The blog is run by a group of jewellery designers who work in multiple mediums. Their mission is to operate a collaborative blog “written for jewelry designers using handmade and high quality components in their art jewelry”


Another blog run by a group of professional jewellery designers, they tell the story of their purpose best “Art Bead Scene is an interactive blog with the goal of uniting bead artists of all materials and the jewelry designers who use art beads in their work… To us, art beads are incredible, tiny works of art made by hand from the finest materials by some of the best artists in this country and around the world.”


Similar to the last 2 blogs, this one also focuses on handmade art beads. Love my Art Jewelry is run by a group of artisans located in the UK. I find you get a very different perspective from this group of artisans.


Interweave runs this blog. They are a company that offers books, magazines, tutorials, digital products, DVDs and Videos. There are 3 blogs and many forums available through this link.


Another blog run by a company, this one focuses on jewelry making tips, news and videos. Of course this company's products are focused around wire based jewellery.


Also run by a company, the editors of this blog come from many backgrounds and feature jewellery inspirations based on the Halcraft products, fashion ideas, book reviews, DIY ideas and much more.


Because these last 3 blogs do have a focus on their own products, I find I don’t check them out as often as the others. They do present some fresh alternatives though.

Another time I’ll talk about other types of blogs. 

Monday 19 January 2015

Now On Pinterest

I have had a personal account on Pinterest for a long time and have debated having a business account for almost as long.

One of my goals for 2015 is to expand my online presence. Now I’ve taken the first step. My Pinterest account for Bijoux Gems Joy went live today!


On Pinterest I have created boards that cover some of the many interests I have outside of my much loved Jewellery obsession.


Check it out and tell me what you think. I’m always looking for feedback and suggestions.

Friday 16 January 2015

Earrings Everyday – January Inspiration

It’s time for the monthly Earrings Everyday Inspiration reveal. January’s inspiration is based on the Pantone Spring 2015 Colour Palette. The Pantone Colour of the Year is Marsala. I found this colour palette on the website for Cool Hunting Magazine.


We were encouraged to select the colours we like and use them.  Here’s what I made.


Let’s Go Sailing


The pretty little sailboat charms are stoneware beads with a deep red glaze made by Diana Ptaszynski of Suburban Girl Studio. To me they scream Marsala. The stoneware colour peeking through is like a darker version of the beige-like Toasted Almond colour. I added ceramic beads in variegated blue and matching beige colours, copper wire with a steel blue coating and Gunmetal earwires.

With the right colours Marsala comes to life. I’m happy with how these earrings turned out but I think I want to add some softness to the middle. Maybe some ribbon or sari silk wrapped around?

 
Cameo

This second pair is very delicate and feminine looking. The focals are pretty Lampwork cameo beads by Susan Kennedy of Sue Beads. In a deep Atlantis Blue colour with little soft white flowers they are very pretty and remind me of the Classic Blue. The blue is difficult to photograph but it is richer in person than in this photo. They have been paired with pink opal beads in 2 shades, reminiscent of pale versions of Strawberry Ice and Tangerine. I used sterling silver for the finishing pieces.

I know I will be doing new photos of these before posting them in my online store. Even with that I like the soft look of this pair. 

Now come see what everyone else created.

Wednesday 14 January 2015

Transforming a Studio – Part II

Back in November I posted about cleaning up and organizing my studio space, even showing some photos with visible bench space! Well that didn't last too long. Here’s what it looked like during the muffin tin challenge at the start of January.


Hiding under that tin were the components for another 4 or 5 projects either waiting for inspiration, waiting to start, on the go, waiting for clasps, or waiting to be photographed, priced and posted…


Here it is less than 2 weeks later and I finally feel like I’m getting somewhere in my messy space challenge. I purchased a new organizational unit (actually a scrapbook organizer on clearance) and have almost filled it. Two of the drawers are filled with copper wire.

One photo I never remembered to take was the one of the comfy chair right beside my desk with the large box full of copper wire, and all the extra copper wire waiting to be stripped of its coating. We had our heating system replaced last summer and they had to change some of the wiring because it was undersized for the load. I kept all the old wire, filling 2 drawers with it. I am upcycling bit by bit. I figure that I should run out in about 20 years – it was a long run of wire.

Three of the remaining drawers are filled with chain, sheet metal and packaging supplies. The last drawer is already partly filled with links and bead caps.

Everything else I either put away or placed in project containers that I've been collecting – old fridge containers with no lids, empty plastic containers for bulk cashews and other snacks, and so on.

The photos below show what the space looks like now, one project in progress. That’s the plan, one project actively being worked on at a time, any others kept in containers, either resting from a process (drying, etching, tumbling, whatever) or waiting their turn to be started. These are all in that stack on the left side.

Now comes the real challenge. Sticking to my new method…


Monday 12 January 2015

Trends for 2015 – In Jewellery

I enjoy making jewellery, and other things, that I like and that I think my customers will like. I don’t typically follow fashion trends, though I do like to see what is happening in the world of home decor. Even then I don’t follow the trends much.

Having said all of that, I've been spending some time since Christmas doing some thinking about where I am in my jewellery business and where I want to go. I've begun exploring some new mediums (see recent my post on polymer clay for example) and wondering if it’s time to submit some pieces to jewellery magazines.

If I do decide to submit to magazines, I need to ensure my pieces are on trend. So this is how I've ended up spending some time checking out trends. I just Googled “Jewelry Trends 2015” (I went with the American spelling. It makes Google happier) and came up with 61 Million results. Wow!

I checked out Vogue and Harper's Bazaar magazine predictions. These were the top 2 responses for my search and well, a girl’s only got so much time after all. The posts for both magazines were from October 2014, in line with the advance reviews and shows that are typical of the industry.

I’m still working my way through my reactions to the trends, deciding what fits my style and interest. I’ll let you have a look for yourself. Just click on the photos for the links. Have fun!


Harper’s Bazaar Jewellery Trends Report

A final note, just after I finished writing this post I was doing some blog hopping of my own and came across a very similar post on the Love My Art Jewellery blog. This is a UK site that I found recently. Check it out here.

Friday 9 January 2015

Lampwork Beads – Little Pieces of Art

Right from the beginning of my venture into the world of jewellery making I have been fascinated with Lampwork beads. I have been purchasing one offs from local beading stores for 4 years, occasionally using them in my creations, for example check out my MuffinTin Challenge Sunshine bracelet. Mostly though I’ve been hoarding them…

I have even tried my hand at making my own Lampwork beads at a workshop held by the CreativFestival in Toronto about 2 years ago. I have to admit that it was a major fail! I still have the “beads” that I tried to make, just couldn’t part with them either, but they won’t be used in any jewellery that’s for sure.

Lately I’ve discovered some amazing Lampwork bead artists through the many blogs that I’ve been following.  One of those blogs, Art Jewelry Elements, had a recent posting by Sue Kennedy of SueBeads that explained some glass terminology. You can read about it here.

I recently purchased a whole bunch of Lampwork beads from Sue, and they arrived today! I am so excited I just had to show off some of them.


Rustic Rainbow Disc Beads

Look at all those pretty colours! I bought 2 sets so there’s lots to play with and mix and match


Cameo Beads in Atlantis Blue


I bought 6 pairs of these beads in different shades and colours. Oh the elegant pieces I’ll be able to make with these.


Sandstone Ivory Raku Beads


The variety of colours in this pair just pulled me right in. I had to have them.


Coral Sparkle Mini Beads

I bought 4 sets of the Sparkle Minis in 3 different colours, 3 sets in matte finish and 1 set with the glossy finish. I am quite taken by this type of bead and have admired them on many websites. Sue’s photos and information convinced me it was time to get some


Banana Flower Chicklet Beads


Sweet little beads. I finally have a set. Oh the plans I have…I need about 20 more sets to fulfill them.


Earth and Ocean Large Focal Bead

And finally, I just could not resist this beautiful bead.

Gemstones and pearls will always be my first love but I have come to realize that Lampwork beads will be giving them a good run for that spot. I plan to start creating this weekend!

Wednesday 7 January 2015

The Joy of Tutorials

The jewellery community is a very generous group, constantly helping and encouraging each other and anyone interested in how to do something.

Since I started my jewellery making adventures 4 years ago my skills and knowledge have grown significantly. Back then I could not have envisioned of the designs I make and techniques I use on a regular basis now.

A good part of my growth is directly linked to the generosity of other artisans. Tutorials and how to tips are available all over the place. Today I thought I would share a few of these with you.


THEA Jewellery Flower Tendril Earrings
Leslie Watt, owner of Thea Jewellery and Thea Elements, is a talented lady who makes both jewellery for sale and jewellery components. She is a member of the Self Representing Artist Jewelry Designer group and is a contributor for the Art Jewelry Elements blog. Leslie has posted a tutorial for these pretty little Flower Tendril Earrings on her blog.

 
Judy Larson’s Viking Knit Bracelet
Judy Larson is a retired teacher and reader of The Beading Gem’s Journal. She is be a highly creative individual accomplished in many crafts, with many admirers. Judy does not sell her jewellery and does not have a website. Actually, she gives away most of her creations and has happily offered to share her PDF tutorials with anyone interested. This VikingKnit Bracelet is an example of her generosity. Readmore about Judy here.

Speaking of generous individuals, Pearl Blay, owner of The Bead Gem’s Journal is another such artisan. Read all about Pearl here.


Another of Rena’s Many Tutorials
Rena Klingenberg owns the Jewelry Making Journal. She has developed a forum where many jewellers, brand new to the craft and experienced, feel comfortable to go to share what they are doing, read about the trials, accomplishments, successes and, yes even failures of other artisans. They can ask questions, share tips, show off pieces they are pleased with, and generally help each other out.

Rena also shares many free tutorials like her ColorfulTassel Jewelry and, like many others, offers courses. Read more about Rena here.

 
Dainty Gift Tags
And now for something different, a blogger who puts the concept of recycling to good use. Claire specializes in giving new life to items that have outlived their original purpose. These DaintyGift Tags are an example of the upcycling that she does. Read more about Clairehere.

These are just some of the tutorials and tips you can find online. There are thousands more out there. Do spend some time exploring different sites, including online vendor websites. You will be amazed at what’s available.

Would I do a tutorial? Perhaps in time when I feel I’ve developed enough.

By the way…I am not sponsored by any of these sites. The opinions provided here are entirely my own.

Sunday 4 January 2015

New Year Muffin Tin Challenge

Just before Christmas, Heather Powers of Humblebeads issued a Muffin Tin Challenge. The challenge idea is simple. As Heather said “Fill the cup of a muffin tin with everything you need for one project – the focal bead, accents, chain, findings – whatever you would need to complete one project and put that in one cup. Your mission is to simply arrange those beads in a sassy design and complete those 12 projects as quickly as possible!”

Although 12 projects is ideal, a minimum of 6 was acceptable. I had convinced myself there was no way I could complete this challenge, then realized I could accomplish 6 if I tried. 

Here is my muffin tin pan (Excuse the grungy look – it is a well used pan)


After I took the photo I realized it was really hard to see the components in the 6 tins so I made this collage (though it probably would have been better if I had taken the components out of the packages)


Working through each project, I made changes as I went along. My original selections either didn’t work the way I wanted or I wasn’t happy with the results. Here are my completed projects.

Wrap It Red Bracelet

This is a triple wrap bracelet, made for someone with a size 7 ½ inch wrist but adjustable up to 8 ½ inches. The bracelet is made with red glass Tilla beads in 3 shades and sheens and red glass teardrop beads for 1+ wraps. The remaining wraps are of Brass box chain. I made the extender using another brass chain with a teardrop bead wired to the end.

Ombre Sticks and Flowers Earrings

Next are these earrings, also made with glass Tilla beads. This time I used 4 shades of beads to give an ombre effect, and added Czech glass flowers in another shade of green. The space between the Tilla beads and the flowers was wrapped in mint green cording and everything was strung on copper wire, attached to copper lever back ear wires.

I made a second pair, slightly different, as an extra because I wanted to practice the technique again.

Ombre Garden Earrings

This time I used half the number of Tilla beads, went with light brown flowers and added multi shaded leaves. Did you notice the copper “bead” on each of the earrings? That’s a crimp cover. Yes, I used beading wire for these two pair of earrings. I couldn’t get the copper wire to co-operate and tried the more flexible wire instead. I think I’ll keep practicing with the regular wire if I decide to try something like this again. This was a bonus pair, not part of my original 6 selections.


Sunshine Bracelet

This bracelet is built around the gorgeous Magatama beads I picked up recently at a local shop. I was undecided about which focal piece to use with them (see the photo above for the other option), but then decided I liked this almost clear Lampwork bead with the touch of colour in the middle of it. There are hints of cream, yellow, green and the slightest bit of brown. The artist is unknown as I had purchased it about 4 years ago and forgot their name. I added button beads to complement those shades and used 14 Kt gold filled wire and clasp to complete it. I really like the sunny hue to this bracelet, especially after this weekend’s gloomy weather.

Shielded Earrings

At the sale where I got the Magatama beads, I also acquired these pretty copper embossed and domed circles. The discs are enameled with a deep purple on both sides and have a lovely variation in colours and shades. I used sterling silver to add natural white freshwater pearls in a diamond shape to the tops and bottoms and hung everything from sterling silver ear wires.

Pagoda Bracelet

The fifth piece is this mixed metal bracelet with copper and bronze pointed links, silver plated spacers, bronze filigree toggle clasp and ceramic beads. I had planned to use multi coloured Hematite squares but felt there wasn't enough pop so I went with the silver plated square spacers instead. This bracelet is a real mixture of several metals. I had a lot of fun making it.


Deep Forest Necklace
The final item that I planned was this necklace. The colours were chosen to complement this gorgeous pendant focal from Tesori Trovati, that I was lucky enough to win from Erin Prais-Hintz in another blog challenge. For some reason I used a different pendant from Erin in the photo, still not sure why I did that. The focal was paired with green ceramic beads, Bronzite beads, Copper and Bronze double hole spacers, Swarovski crystal clear Wild Heart beads, antiqued bronze toggle clasp, one leather cord and one deep green beading wire. I didn’t want to have a traditional strung necklace and tried to mix it up a bit with the double hole spacers and leather cord.

I was happy with the necklace and made a bonus pair of earrings to go with it.

Deep Forest Earrings


 With the 2 extra pair of earrings I ended up making 8 pieces of jewellery, and am pretty happy with the end results. Heather was certainly correct, talk about starting the year with a bang! Check out what everyone else made here.

Now to get them posted in my store…